
Almost all email marketing experts and tools advise using the best email-sending practices. But what are these “practices” anyway?
Today, we’re gonna talk about one of the most important ones here:
Setting up anti-spam policies for your domain address.
SPF, DKIM, and DMARC are email authentication methods used to demonstrate to online servers that you are legitimately authorized to send emails from your specific domain. To sum up the importance, anti-spam policies serve 2 purposes:
a) preventing others from sending emails on your behalf utilizing your domain address.
b) marking yourself as an authentic email user, who cares about the ecosystem, and follows the best procedures.
To know about SPF, DKIM, and DMARC please refer:
Email Authentication Protocols (a brief overview)
In this blog, we’re gonna explore the answers to a popular question:
How do you add these records to the DNS zone of your domain?
Let us investigate.
Adding SPF Records
step-1: Log in to your admin account on the website of your domain host like AWS, GoDaddy, cPanel, Namecheap, etc.
step-2: Navigate to the DOMAINS section and select the domain address for which you wish to set up the anti-spam policies.
step-3: Make your way to the DNS zone/ Manage DNS option.
step-4: See if your domain provider has already added an spf record.
A typical SPF record looks like the following:
v=spf1 include:_spf.mail.hostinger.com ~all , or,
v=spf1 include:_spf.google.com ~all
The name depends on your email provider.
If no default spf record is present, add the same yourself by following these steps:
step-5: Click on “Add Record.”
step-6: Select TXT as your DNS type.
step-7: For host/ name of the record, type in “@”.
step-8: Time to change the TTL value as per your email provider’s recommendation, you can use the “default” value as well.
step-9: If your domain provider has some other requirements, such as “priority”, we recommend doing a quick google search for the same.
step-10: Save changes by clicking on the Add Record button.
Adding DKIM Records
The DKIM record specifics depend on the combination of the domain provider and email provider you are using.
For example: if you’re using Hostinger, both as your domain host and email service provider, it will automatically add DKIM records to your DNS zone.
Different servers have different approaches to DKIM, and you can always google a solution for your specific platforms.
Since Google Workspace is most widely used as an email provider, let us explore the procedure for adding DKIM records for the same:
step-1: Sign in to your Google Admin console.
step-2: Navigate to Apps -> G Suite -> Settings for Gmail -> Email Authentication, provided in the top left menu.
step-3: From the drop-down menu select your domain.
step-4: Generate a newly created record by clicking on the Generate New Record.
step-5: Copy the hostname and TXT record values to your clipboard.
step-6: Log in to your admin account on the website of your domain host like AWS, GoDaddy, cPanel, Namecheap, etc.
step-7: Navigate to the DOMAINS section and select the domain for which you wish to add the DKIM record.
step-8: Make your way to the DNS manager/ editor section.
step-9: Check if your domain host has already added DKIM record(s).
A typical DKIM record looks like:
hostingermail-c.dkim.mail.hostinger.com
If no DKIM record is present, follow the next steps:
step-10: Click on “Add Record.”
step-11: Enter “default ._domainkey” in the name/ host section.
step-12: Select TXT as the DNS type.
step-13: Enter the recommended TTL value, you can also use the default value.
step-14: Paste the value/ content you copied in Instruction-5 in the value/ content text box.
step-15: As a final step, click ADD Record.
step-16: Go back to Google and click Start Authentication.
There you have it – your DKIM records are now good to go.
Authentication might take its own time – up to 48 hours in some cases.
Hence, be patient.
Adding DMARC Records
Important: Make sure you have added SPF & DKIM records before trying to set up DMARC. Both spf and dkim must be authenticating messages for at least 48 hours before you try to add dmarc records too.
A typical DMARC record looks like:
v=DMARC1; p=reject; rua=mailto:info@shivyaanchi.com, mailto:dmarc@shivyaanchi.com; pct=100; adkim=s; aspf=s
Or,
v=DMARC1; p=none; rua=mailto:info@shivyaanchi.com; ruf=mailto:info@shivyaanchi.com; fo=1
There are a lot more optional variables here, and the usage and values of the same depend on your requirements and email provider.
To know more, kindly visit this Google forum.
step-1: Make your way to the DNS editor/ manager for your domain (as done previously for spf and dkim).
step-2: Select TXT as the DNS type.
step-3: For the name of the record, type in: _dmarc.domain.com,
where domain.com is your real domain name.
Note: Some domain hosts automatically add domain.com – hence you only need to input “_dmarc.” as the record name.
To know which of the two is right for your host, follow the verification steps that we’ll discuss at the end of this blog.
step-4: Enter the recommended TTL Value, or just select “default.”
step-5: Enter the content/ DMARC value as per your needs.
step-6: Save changes by clicking on Add Record.
Your DMARC record should be functional within a 48 hour window.
Verifying SPF, DKIM, & DMARC For Your Domain
In order to verify whether you’ve followed all steps correctly, there’s a fairly simple way.
Just send an email from one of your email addresses built on the domain.
For example: in order to check if shivyaanchi.com has all necessary email authentications, we’ll send an email from any relative email addresses, say, info@shivyaanchi.com
Then, log in to the receiving inbox and make your way to the email you sent.
Next, find the “headers” or “show original” feature.
For gmail, it’s located in the drop-down menu represented by the three dots next to the sender’s details.
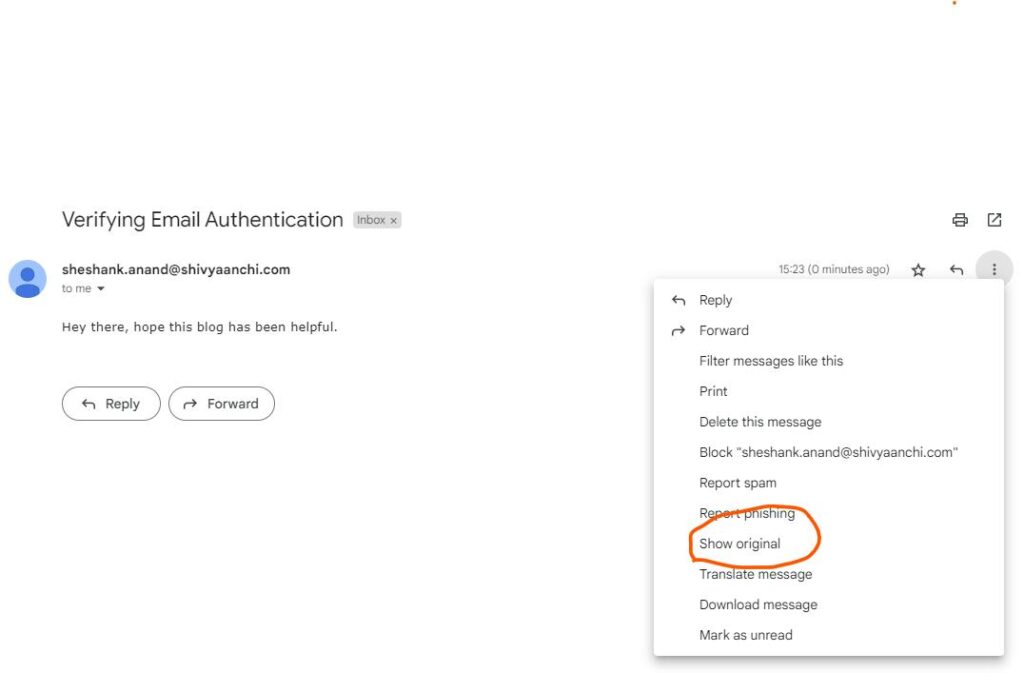
Once you click on this, you shall see a report like this –
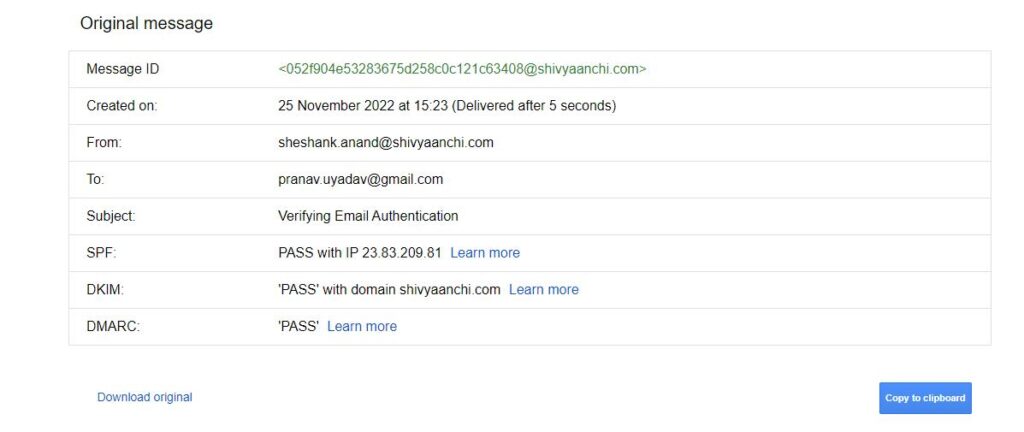
Note the ‘PASS’ indicator besides all the 3 policies.
If you do not get similar results, go back to the setup protocols and make sure there isn’t a fault.
Note: All details above are subject to change – and depend upon what email service you use with your domain address.
That being said, the process remains the same, more or less.
If you’re still facing any issues with respect to the anti-spam policies setup for your email marketing efforts, we’d be happy to help. Leave a comment!
Here are 2 YT videos that we found apt for the purpose, and that you can refer to for quick assistance:
1) SPAM Update 2.0 – How to Setup DMARC for your Cold Emails?
2) SPF, DKIM & DMARC Tutorial | How to setup SPF, DMARC & DKIM in Gsuite 2022